Wednesday, December 4, 2013

Thanksgiving Dessert: Cinnamon Streusel Coffee Cake

Thanksgiving seems to be one of the more complicated holidays. I find
that most people like turkey, but not everyone agrees on the sides and desserts.
This year, my family had a very nice and delicious menu for thanksgiving. It consisted of
: turkey
gravy
mashed sweet potatoes
regular mashed potatoes
homemade veg. stuffing
bread
green beans 
cranberry sauce
red wine :)
shrimp w/ cucumber appetizer
cheese and crackers
nuts and chex mix
kielbasa
lemon tart
CINNAMON COFFEE CAKE
It seems like alot of food, but as of December 2 most of it is gone. It was quite the successful thanksgiving it was! I made this coffee cake for my aunt because she wanted to eat lighter this holiday. Plus, we celebrated her birthday (Dec 1) that day. I was in charge of making her cake. No problem. This is not your traditional New York/ NJ ,overly sweet, crumbly coffee cake. This is a more sophisticated cake. It is not overly sweet, yet it has the wonderful taste and aroma of cinnamon every coffee cake should have. It's weird, some people actually think coffee cake has coffee in it . Silly gooses.. This recipe, unlike most of mine is not from a blog. It is from an old baking book called the Cake Bible. I think people who are over 40 will know what I'm talking about (since the book is from the 80's. A great and talented chef at my college knew of it so I guess I chose the right source for my recipe. Not like I don't like blogs or anything LOL. 
From: The Cake Bible! (cookbook)
Ingredients: Streusel Topping and Filling
1/3 cup brown sugar
2 tbsp granulated sugar
1 cup walnuts or pecans
1 1/2 tsp good quality cinnamon
1/2 cup cake flour
4 tbsp butter, softened
1/2 tsp vanilla
Batter
4 large egg yolks
2/3 cup sour cream
1 1/2 tsp vanilla
2 cups unsifted cake flour
1 cup sugar
1/2 tsp baking soda
1/4 tsp salt
12 tablespoons butter, softened

Steps: Have measuring cups ready, oven preheated, mixing bowls, and electric mixer handy. Mice en place!
Preheat oven to 350.
1. To make the streusel and filling, process sugars, nuts, and cinnamon until the nuts are coarsely chopped. * Reserve 3/4 for the filling.*
2. To the remainder, add the flour, butter, and vanilla, and pulse briefly to create a coarse, crumbly mixture for the topping.

TIME TO MAKE THE BATTER
1. In a mixing bowl, combine egg yolks, 1/4 of the sour cream and vanilla.

2. In a large bowl, combine the dry ingredients and mix on low speed for
30 seconds. Add the butter and remaining sour cream. Mix on low speed until
the dry ingredients are moistened. Increase to high speed ( if using a stand mixer switch to medium)
and beat for 1 1/2 minutes. Scrape down the sides as you go.
3. Incorporate the egg mixture in 3 batches.


^ This is what it should look like after everything is incorporated. Nice and fluffy!
4. Reserve 1/3 of the batter and scrape down the remainder into a prepared pan.
Try to smooth the batter as much as you can so the cake bakes evenly.


5. Sprinkle the streusel filling and spread over the top of 
prepared batter.


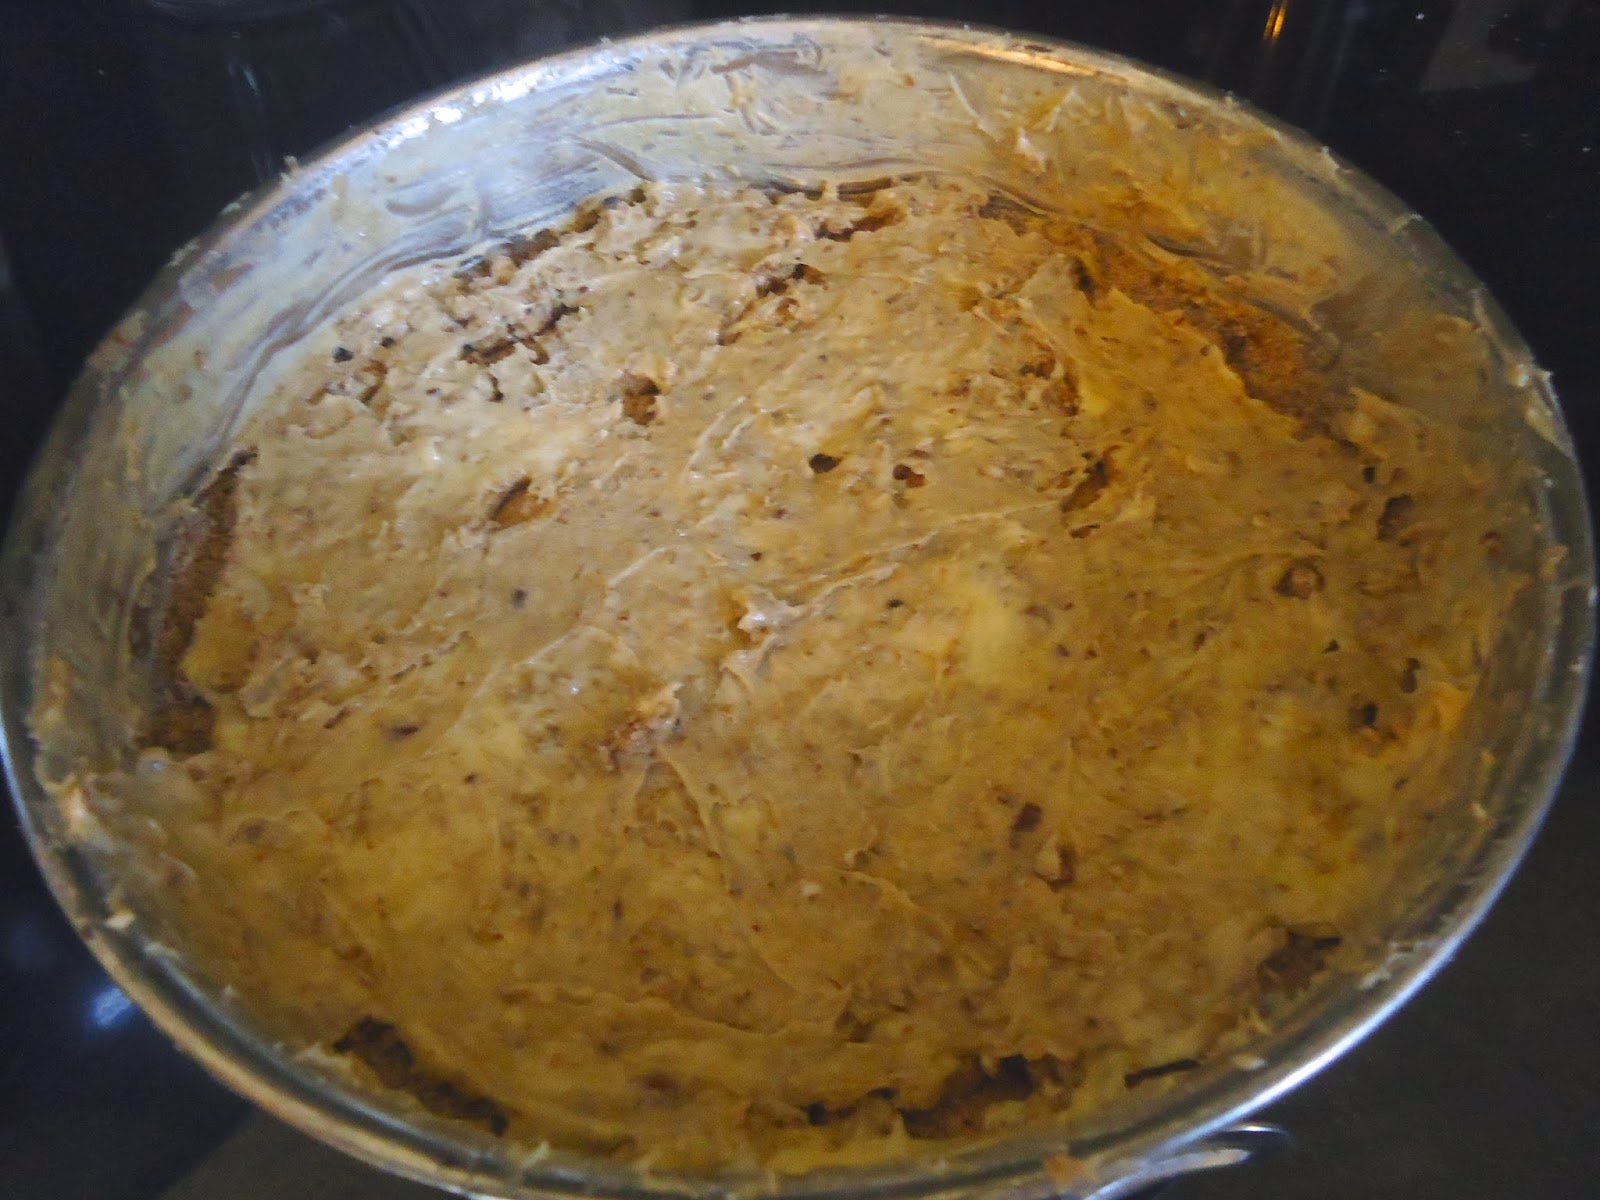
6. Add spoonfulls of the reserved batter over the top of the streusel.
7. Spread the mounds of batter over the streusel topping. This may be tedious to do,but do your best.
It's worth it, I promise.
^ See I did it!
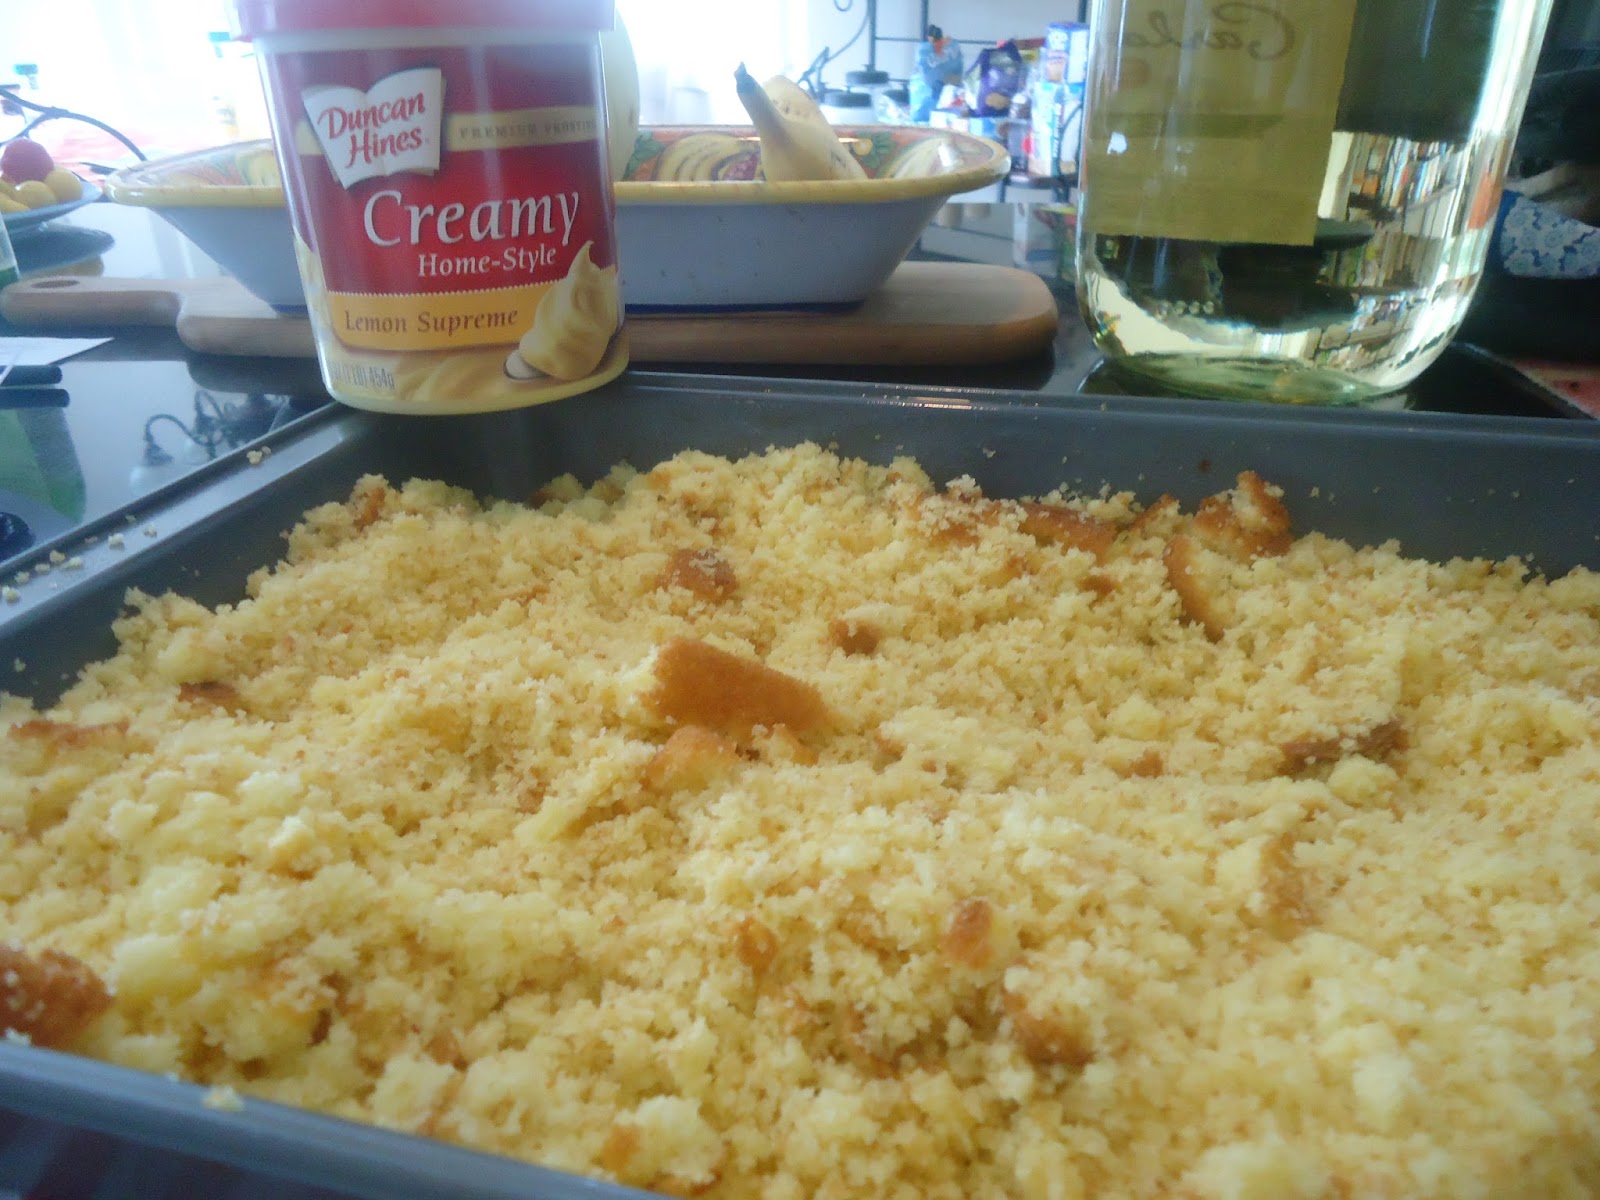
8. Sprinkle with remaining streusel topping made earlier.
9. Bake at 350 for 55 to 65 minutes. Cover loosely with buttered foil after 45 minutes to prevent 
overbrowning.

Serves 8-10
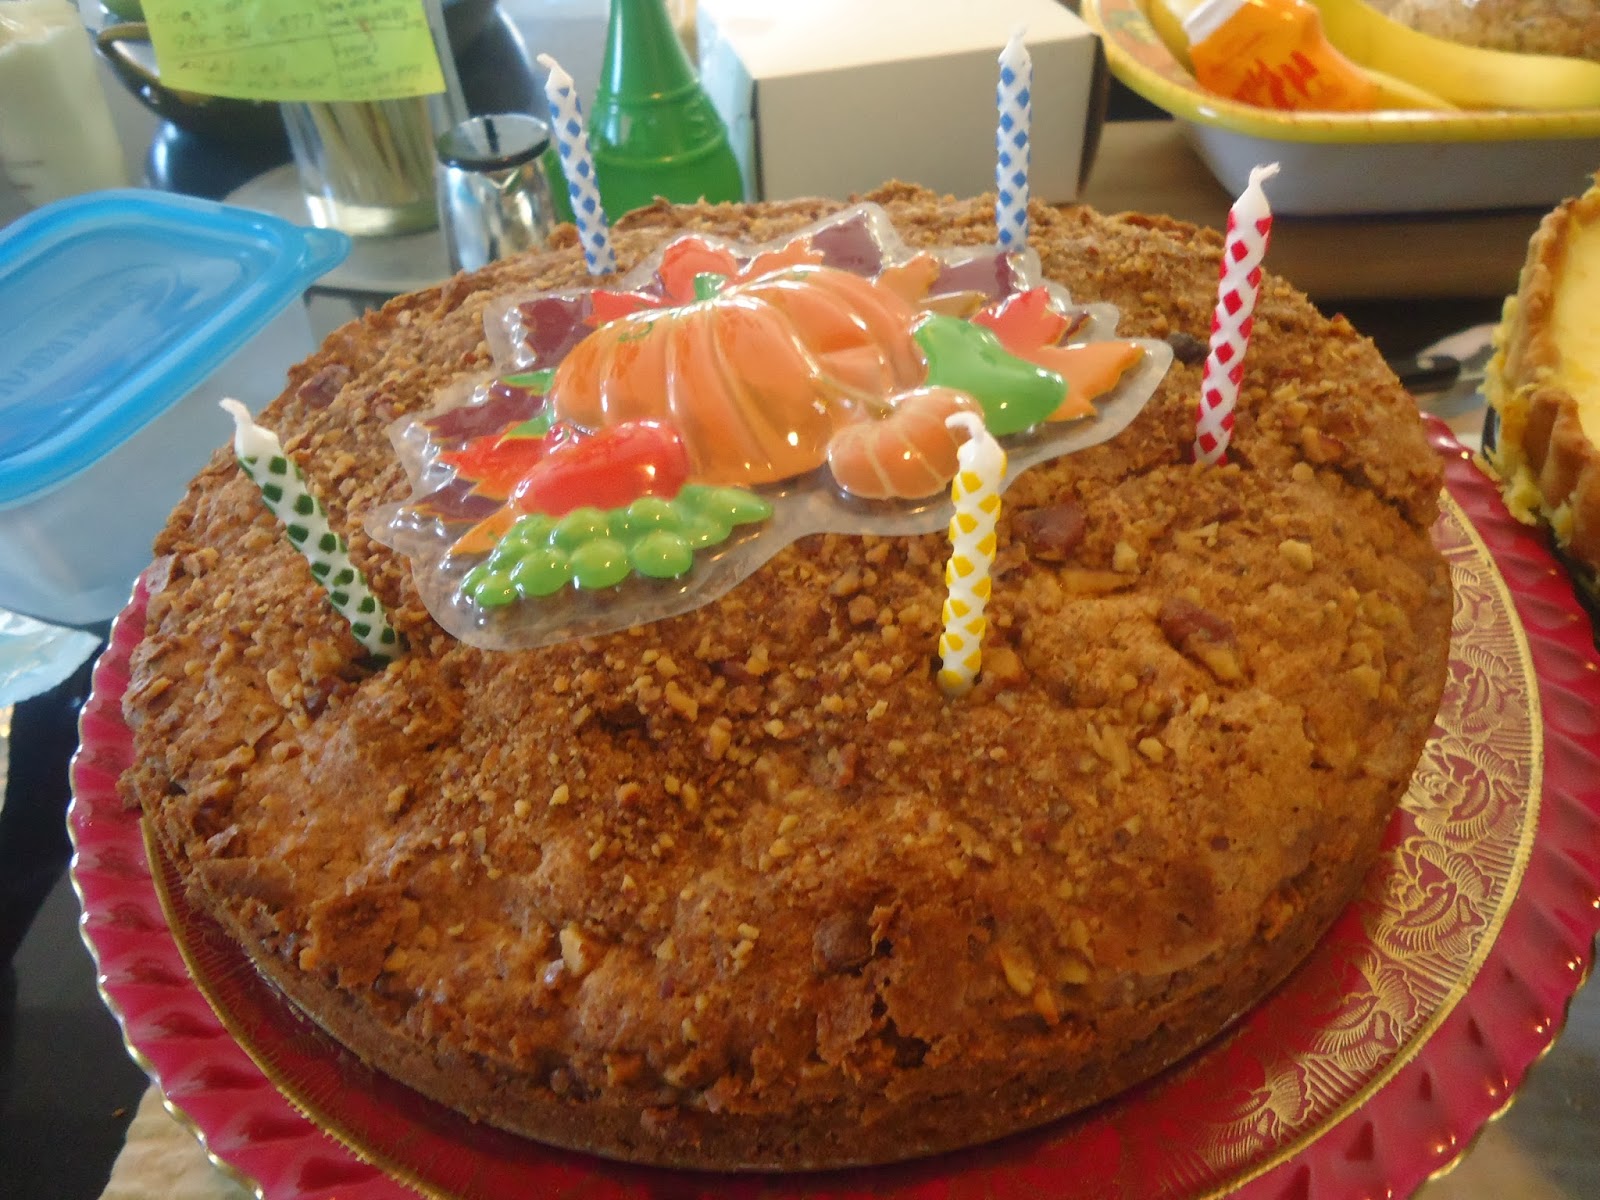
It makes a great birthday cake for anyone who isn't into 
those overly frosted and sweet birthday cakes. You know what 
I'm talking about.


Monday, December 2, 2013

Try This For Breakfast: Dutch Puff Pancake!

From:WholeFoods Market site
Look how puffy it is!! Look at it! So it's that time of the year again. My brother has come back
from college for his first fall break. My mother made him all his dinner favorites such as pasta with meat sauce and steak. Now I wanted it to be my turn to make something special. It seems he doesn't eat anything exciting at his dorm for breakfast because he is far from the dining hall. That means he just has boxed cereal almost every day. BORING! I researched through my recipes for a great breakfast recipe and I remembered that I have been meaning to make this. I'm not sure why they call this a Dutch "pancake". I'm not sure what it looks like, but it tastes good too. It reminds me of  a very light,crispy, and eggy version of a pancake. It is delicious nonetheless. I served this with some homemade cinnamon apples.Feel free to fill it with whatever you like, though.  This is a quick recipe to make, do not be discouraged by the looks of it.

Ingredients:
2 tbsp butter/margarine
1/2 cup flour
1/4 tsp salt
4 eggs
a pinch of vanilla
* Cinnamon Apples ( you can fill it with anything you want)
Steps: Have butter melted and eggs beaten : MICE EN PLACE. There's not much to say since this is an easy recipe. :)
1.Preheat oven to 425. Grease a 8 in pie pan with spray or butter, set aside.
2. Melt butter over low heat and place in a small bowl.
3. Place eggs, flour, milk, and vanilla in a blender.
4. Blend until smooth and lumps are no longer visible.
5. Pour mixture in the greased pie pan.
6.Bake for 25 minutes, or until pancake is puffed and golden brown.
7. Top with your desired filling and cut into slices.
^ Isn't it pretty?!
Crisp on the outside, light and soft on the inside.YUM. 
 
Serving Size: 4-5 people


Sunday, October 6, 2013

Did Someone Say French Toast?!: French Toast Flavored Protein Shake

From: The Dashing Dish
I promise this will be one of the last healthy recipes.. JUST KIDDING. Last weekend my parents went on vacation, so I had the house to myself. Most would think I would cook up a storm , but I wanted to focus on getting a lot of homework and exercise completed. I mean who wouldn't take advantage of being alone. You don't have to tell anyone you are going out/ won't have anyone distracting you. Sorry that was an ADD moment right there.. back to the protein shake! I've made quite a few of these shakes over the past week, this one was pretty damn tasty. It does not taste exactly like French toast but it has a fresh maple and brown sugar flavor. I especially enjoyed this recipe because the cottage cheese was muted out more than the previous shakes I have made.I know putting cottage cheese in a shake scares most of you, but I assure y'all it makes the shake more "shake like". As a final note, I suggest making this for breakfast or a snack because it will not keep you full during lunch.
Ingredients:
1/2 cup cottage cheese
1 scoop vanilla protein powder(Designer Whey)
2-3 tsp sugar free/regular maple syrup
3-4 tsp stevia
3/4 cup water
6 ice cubes
 
Steps:
1. Blend everything together until desired consistency is reached. Top with whipped cream or cinnamon!
 

Thursday, October 3, 2013

Worth Waking Up For: Protein Packed Vanilla Cran- Banana Pancakes


Adapted From: Designer Whey Website
I am really crazy about Designer Whey Vanilla Protein Powder. Ever since I made my first shake with it a few days ago, I can't go without it. At 100 calories per scoop and over 20 grams of protein there's no reason not to like it. I especially love it because it keeps me full. After going through a few
protein pancake recipes I chose this one because it was a simple and delicious recipe. I left out the blueberries in this recipe because I didn't have any. These hotcakes were great without them, they tasted like banana pancakes with some vanilla. These pancakes had a nice texture and were filling for an 8:00 breakfast. I also added a tablespoon of plain yogurt for moisture.
     Ingredients
 1/2 scoop Designer Whey Vanilla Protein Powder
1 large egg
1 medium banana
1/4 teaspoon baking powder
2 tablespoons flour ( I used all purpose)
1/2 teaspoon vanilla extract
dash of cinnamon
1 small handful of craisins
1 tablespoon plain yogurt
Steps: Have all ingredients out and a hot pan ready when the batter is prepared.
1. Thoroughly mix all ingredients in a medium bowl.


2. Heat a pan with non- stick cooking spray. Wait until the pan gets hot before you pour the batter on.
3. Spoon batter onto the pan. Make the pancakes large or small, I don't care! I made 3 small pancakes and one medium one.
Look at the beautiful babies cooking!
4. Cook until both sides are nice and golden brown.
5.Top with syrup, jam, or NUTELLA!

Serves: 6 small pancakes, or 3 small + 1 medium pancake

Wednesday, October 2, 2013

Using What I Have: Raspberry Oatmeal Parfait

Adapted from: Dashing Dish
I want everyone to know this... I LOVE BREAKFAST. Unlike some of my peers I am a breakfast person. Without this meal at the beginning of my day I would probably pass out. Yes, it's true. I cannot focus without eating in the morning. I am on a health kick, but that does not  mean I am sacrificing a full stomach with food that tastes good. I recently stumbled upon a site called DashingDish.com. This blog site is not funded by advertisements, so if you want access to all of the wonderful recipes you need to pay a small monthly charge. I'm cheap, though and will find the free recipes and try them out. I made this recipe my own by adding raspberries instead of blueberries, and plain yogurt instead of greek yogurt.The oatmeal prepared with bananas and almond milk is absolutely delicious, I would eat that by itself! This recipe is around 320 calories, but think of it of a healthy sort of fill. You are getting a good source of grains, calcium, vitamin c! This parfait is pretty and even better to eat.
Ingredients:
Oatmeal Layer
1/2 cup quick oats
3/4 cup almond milk
1/2 small banana, mashed
2-4 packets stevia sugar
Yogurt Layer
1/2 cup plain yogurt
2-4 packets stevia
Raspberry Layer
1/2-1 cup raspberries
 
Steps: Have all wet and dry ingredients ready for use . Prepare oatmeal layer first. MICE EN PLACE!
1. For the oatmeal layer: Add oatmeal and almond milk in a bowl and microwave 2-2.5 minutes ( or until oats are cooked).
2. Stir in mashed  banana and set aside.
3. Yogurt Layer: In a separate bowl stir together the yogurt and sweetener.
Assemble the Parfait:
4. In a large glass,bowl, or mason jar begin to layer the parfait starting with the yogurt,raspberries and oatmeal. Continue this process until all the ingredients are gone.
DEVOUR!!
Serving Size:1 huge parfait


Tuesday, October 1, 2013

Another "Better For You" Sweet: Cosmic Chocolate Fudge Brownies

adapted from: Chocolate Covered Katie
As some of you know I love 2 things:
1. CHOCOLATE
2. DESSERTS
I really love chocolate desserts that are guilt free. Yes, I am still on my health kick.
Recently, I came upon a healthy dessert blog called "Chocolate Covered Katie."
This blog pretty much saved my life. It reassured me that I can have naughty food
that won't go to my hips right away. I was kind of skeptical about using this recipe because
it had no eggs and included tofu. The picture was very attractive and the reviews seemed
positive, so I took a risk. Luckily, the risk I took was one of the best risk's I've ever taken.
These brownies were some of the best homemade brownies I've ever had. Especially if
you add some low sugar chocolate frosting. I did not use the frosting/coating recipe
she posted because I did not have maple syrup and coconut oil. Plus, I'm not so sure about
the taste of that combination. Instead, I frosted these brownies with a thin coating
of sugar free frosting and a ton of SPRINKLES! It was a great way to use them up.
I'm definitely looking forward to making more of Katie's (from Chocolate Covered Katie)
guilt free treats. PS: These were a hit with my friends from culinary school. See, food doesn't always have to be so decadent to be delicious. :) Changes I made are in red.
 
Ingredients:
1/2 cup cocoa powder
1 cup all-purpose flour
1/2 tsp baking powder
1/2 tsp salt
2 tsp instant coffee granules
1 cup truvia*
1/2 cup large chocolate chips
6 tbsp silken tofu
2/3 cup applesauce
2 1/2 tsp vanilla extract
2 tbsp milk of your choice
Can of sugar free chocolate frosting
SPRINKLES!!
 
Instructions: Have all your ingredients on hand and measured before you start putting these brownies together. MICE EN PLACE
1. Preheat oven to 350 and grease/spray a 9x13 baking pan.
2. Combine all your dry ingredients,including chocolate chips and stir well.
3. In a smaller bowl, combine all your wet ingredients.
4. Pour your wet (weird looking)mixture into your dry ingredients. Stir well until the mixture is lump free and resembles brownie batter.
5. Pour mixture into your prepared pan and bake 30-34 minutes.
6. Allow to cool and spread with a thin layer of chocolate frosting. YOU WILL NOT NEED THE
WHOLE CAN. Lastly, top with as many sprinkles as you like.
Refrigerate after using. They taste better a little firm.
Serves: 15-20 Little Debbie size brownies


Saturday, September 21, 2013

Back In Business! - Healthy Pumpkin Muffins with Pecans

Adapted from: Allrecipes.com
                             Hey, long time no blog, I KNOW! As some of you know I am starting my second year of college and since August things have gotten crazy. I have been busy with homework, projects, and cooking in my classes. It never ends. I have Friday's off and have been dying to blog and just cook/bake for fun at home. I am so happy I got the chance to bake this weekend. Fall is on the way and it is a great time to start cooking with pumpkin. My family has been on a health kick recently and I have joined their craze, too. For a while, I've been on a mission to find healthy breakfast and dessert recipes. Luckily, I stumbled upon these "better for you" muffins from all recipes.  You will see in the recipe that I adapted this recipe for my mother's taste because she is not a huge fan of chocolate chips+ pumpkin. The changes I made to this recipe are in red and I crossed out what was originally added in. ( you will see :)
                                                  Ingredients:
                                                  cooking spray
                                                  15 oz pumpkin puree
                                                   1 egg
                                                   2/3 cup white sugar
                                                   1/4 cup vegetable oil
                                                   1/3 cup applesauce
                                                   2 teaspoons vanilla extract
                                                   2 cups all purpose flour
                                                   1 package sugar free vanilla pudding mix
                                                   2 teaspoons baking powder
                                                   2 teaspoons ground cinnamon
                                                   1 teaspoon salt
                                                   1 teaspoon baking soda
                                                    6 oz semi-sweet chocolate chips
                                                   4 oz chopped pecans
                                                    Caramel sauce ( for drizzling)
                                                    1 pinch pumpkin pie spice
                                                     brown sugar ( for topping)


     Have all your dry ingredients and measuring cups ready! Since there are a lot of ingredients, try putting your large containers of flour and sugar away when you are done using them so your counters are not crowded! MICE EN PLACE!
                                               
                                                       
      1. Preheat oven to 350 degrees. If you want to make muffins and mini loaves, spray 6 muffin cups and 6 mini loaf pans.
      2. Mix pumpkin puree, egg, sugar, vegetable oil, applesauce,and vanilla extract together in a bowl.

      3. Mix flour, pudding mix, baking powder,cinnamon, salt, pumpkin pie spice, and  baking soda together in a large bowl.
                        
      4. Slowly incorporate pumpkin mixture into flour mixture. Stir in chopped pecans.
                              
      
      5.Using an ice cream scoop, scoop muffin mixture into prepared pans.
                       
     
      6. Bake for 20-25 minutes until an inserted toothpick comes out clean.
      
      7. Cool on wire rack or in pans for at least 30 mins.

      8. Drizzle on caramel sauce.
 
                                                Serving Size: 12 muffins


Monday, August 12, 2013

My 2nd Attempt Making Cake Balls: Lemon Coconut Cake Balls

                 
                                      Who knew a dessert/snack made with 5 simple ingredients could be so sinfully delicious? Meet the cake ball. By now most of you readers have heard of them. A cake ball is basically crumbled cake of your choice (boxed or homemade) mixed with enough ( storebought or homemade) frosting to roll into an appropriately sized ball. Then these babies are dipped in ganache (chocolate chips+ warm heavy cream). Finally you can decorate these with the toppings of your choice. The combinations are endless. These weren't a planned recipe, but I meant to buy buttercream frosting , instead I accidentally bought lemon frosting in a can. Silly me. I did not want it to go to waste, so I decided to try my hand at cake balls. I made these previously at my job, but they did not come out looking as nice as these. My family loves lemon coconut cake, so these would be perfect and easier to make than a giant layer cake. Right? Cake balls are a great to make during a lazy afternoon where you have not alot to do and you are in the creative cooking mood. 
WARNING: THESE DO GET MESSY. DO YOURSELF A FAVOR AND WEAR SOME GLOVES.
^ see what i mean. this is messy business!
Ingredients
1 package cake mix of your choice- I chose golden cake
1 can lemon frosting
1/2 bag sweetened coconut
1 bag white chocolate chips
-enough hot heavy cream to make velvety ganache-
colored sugar (optional)

OK LETS GET READY TO CAKE BALL.
STEPS: HAVE EVERYTHING OUT TO MAKE YOUR PACKAGED CAKE MIX, CHOCOLATE OF YOUR CHOICE, TOPPINGS, A PARCHMENT PAPER LINED BAKING PAN, CAKE PAN (SPRAYED), FROSTING!! MICE EN PLACE.
                                 1. Prepare cake according to package directions. 
                                 
2. Let cake cool and crumble into nice crumbs.
 
^ Like this. EASY. Now it's frosting time.
3. Add frosting by spoonfuls into cake crumbs. You will end up using almost all the frosting.
4. Combine the cake and frosting with your hands until it becomes a uniform mix.
5. Shape into small-medium size balls.
6. Refrigerate on parchment paper lined tray. 
7. Prepare ganache by heating heavy cream in a small saucepan.
8. Pour choc chips in a medium bowl. 
9. Slowly pour hot cream over choc chips.
Mix until velvety smooth. 
* If the chips do not melt all the way, put the cream and chocolate mix
in the microwave at 5 sec intervals. :)
^ very nice ganache, eh?
10. Take cake balls out of fridge. 
11. Using your hands and 2 spoons , place a cake ball in the ganache. 
12. Using a spoon move it around the ganache. Use your second spoon to pour some ganache over the balls. You want to coat the cake evenly and to have a smooth , round coating of ganache.
13. Do this method until all the cake balls are coated.
14. Place on a parchment paper lined tray.
15. Decorate with coconut or colored sugars.
16. Place back in the fridge until coating is a bit hardened.
17. Devour one by one. ;)

Every cake ball is unique. LOL.
Serves: About 24 cake balls
I loved making this recipe because it kept me occupied and on a sugar high. Also, the combinations
are limitless,be creative.


Wednesday, August 7, 2013

I have the urge to cook and blog! Cheesy corn dip


Adapted from: Food.Com (Trisha Yearwood's Recipe)

I have a thing for corn.. no basically vegetables in general. I was never the kid who didn't eat her vegetables. Last year I attended a graduation party and the host served this wonderful corn dip! It was creamy, sweet, and salty at the same time. I was stupid not to ask for the recipe, but time went on and I forgot about it. At my house we had a lot of chips around and I luckily remembered I always wanted to make this savory dip. My family loved it and I hope you do to. I halved the recipe , and it was plenty for 3 people for 2 nights! Plus its EASY to make with just a few ingredients.
Go ahead dip it in chips, or eat it with a spoon.
* blue indicates changes I made to the recipe

Ingredients:
 ( 1)2 cans of mexican corn ( I used regular sweet corn, it was fine)
(1) 2 Cans chopped green chilies
1 Cup Shredded Monterey Jack Cheese (Mexican Cheese Blend)
(1/3) 3/4 Cup Grated Parmesan Cheese
(1/2) 1 Cup Mayo
CHIPS!!
^ JUST SO SIMPLE AND DELICOUS!


^ Ready for the oven!

Have all your ingredients out and measured.. Simple Mice En Place
Steps:
1. Preheat oven to 350. Grease a small casserole dish.
2.In a medium bowl, mix the corn, chiles, cheeses, and mayonnaise until fully combined. Spread the mixture in the prepared casserole dish and bake, uncovered, for 30 to 40 minutes, or until bubbly around the edges. Serve the dip warm from the oven with corn chips.
Serves 3 .. FOR 2 DAYS!


Friday, July 19, 2013

The Heat Wave Won't Stop Me: Cookie Butter Granola Bars


Adapted from: FruetCake
You may or may not know that the Northeast is experiencing a crazy heat wave this week.It feels like my kitchen has reached 80 degrees inside. My mom doesn't like me baking or cooking too much when these heat waves happen because the kitchen gets pretty hot one you open up the oven. Regardless, I was dying to make a healthy breakfast/snack for the week because I've been eating Special K for days. I had  Trader Joes cookie butter on hand and found this great bar recipe to use it up. I'm so glad this recipe used cookie butter instead of peanut butter because I hate peanut butter. I modified this recipe by adding dark chocolate chips. I LOVE DARK CHOCOLATE ( ok sorry for the ADD moment). This hot weather is not going to stop me from creating good eats. :)

You will need:
2 cups old fashioned oats ( Quaker)
1/3 cup chocolate chips
1/2 cup cookie butter
1 egg
1/4 cup honey
vegetable cooking spray or butter
1/3 cup brown sugar

MICE EN PLACE: have all your ingredients out and oven preheated
1. Preheat oven to 350.
2.Position oven rack in the middle of the oven.
3. Line a 7 by 10 3/4 baking pan with parchment paper and spray. Set aside.
4. In a medium bowl,using a hand beater or large spoon, beat egg white until frothy.
5.Stir the cookie butter,brown sugar, and honey.Add the melted butter and oats.
6. Stir to combine, add in chocolate chips.
7. Using a rubber spatula, spread mixture on a prepared pan. 
8. Bake until the mixture begins to brown, about 15 minutes.
9. Cool for 1 hour.
Bon Appetit!
Serving Size: about 10 bars


Friday, June 21, 2013

Super Duper Easy Apple "Tart"

                                           
Adapted from: The Pioneer Woman
I made this dessert the same day I made the Chicken BLT salad. My boyfriend came to for the day, and I wanted to make lunch for him because I'm pretty sure he missed my cooking. ( lol) Me being me, I couldn't complete the meal without a dessert. I wanted to make something simple that tasted great. During my blog search I came upon this wonderful and simple tart recipe. This is awesome because you only need a few ingredients! Unfortunately, I thawed my pastry a little too much so my portions were not as big as I wanted. If you do this 100% accurate you will get 3 nice sized "tarts". This dessert is quite inexpensive too.
 Ingredients:
1 sheet puff pastry, store bought is fine. (it tastes great to me)
3-4 baking apples, sliced thin,skin on
 1 cup light brown sugar - to sprinkle on tarts
 * vanilla frosting to drizzle on top, optional
Steps: Have apples sliced and puff pastry thawed. MICE EN PLACE
1.  Preheat oven to 415 degrees.
2. Separate puff pastry into 3 equal rectangles.
3. Mix apple slices with enough brown sugar to coat them nicely. 
4. Squirt lemon juice on apples, so they don't turn brown.
5. Arrange apple slices in a straight line on each puff pastry rectangle.
6. Bake for 18-20 minutes. Watch the pastry so it does not burn.
7. Let cool, and drizzle with vanilla frosting.
Serving size: 3 tarts


Long Time NO Blog! :( : CHICKEN BLT SALAD

                  Hello all! Wow it seems like its been a long time since I've actually blogged about a new recipe. Like I've said, I have a job now, so sometimes its hard to get up and cook again. NO FEAR, here is a new recipe. I originally wanted to make a pasta salad or hot pasta dish, but either one would not be best because it would be boring or too hot to eat in this weather. A light bulb went off in my head and I found an idea. BLT SALAD!! I was sure my boyfriend and parents would enjoy this. I was right too. My man asked for seconds and my parents enjoyed it.YAY! Plus, I had left over pasta and breaded chicken cutlets to add in. Also, I spent less money on this because I had those ingredients in my house. All I needed was mayo, bacon, tomatoes , and lettuce. I suggest adding a splash of lemon or lime on top to give this salad an extra yummy kick. :) This is my own recipe, so if you wish to copy it on your blog, please give me creds.
                                                                You will need:
                                              1 bag of lettuce ( I chose American romaine)
                                              1/2- 3/4 cup light mayonnaise
                                              1 medium chicken cutlet, cut into cubes
                                              Enough pasta to fill the bowl you are using
                                              1-2 squirts, fresh lime/lemon juice
                                              5 slices cooked bacon
                                              3-4 Roma tomatoes, chopped
                                      Steps: Have lettuce washed, tomatoes and chix cut, bacon cooked, AND A  BIG BOWL READY! MICE EN PLACE!
                                        1. Combine lettuce, chicken, chopped bacon, mayo, pasta , and tomatoes in a bowl.
                                        2. Stir until thoroughly combined.
                                     
                                        3. Squirt a bit of fresh lemon or lime juice on top.
                                       
                                        4. DEVOUR!
                               
                                         Serving Size:  2-3 large servings


Monday, June 10, 2013

Product Review #1: Healthy Choice Steamers- Portabella Marsala Pasta

       
                Hello everyone, long time no blog, I know! Don't worry I still love cooking and posting my new culinary adventures with you. Recently, I have gotten a internship at a local italian deli/restaurant and have been working two days a week 9-3. I love my new job there, I am learning alot and improving my skills. That, plus having to deal with the death of my grandmother have taken up a few weeks. Another thing, there was an incident with my car, so I was not able to drive it to the supermarket to get what I need to cook for y'all. Anyway, I finally got to the store yesterday with my mother and picked this up for a quick lunch the next day. These new meals just caught my eye.
    I used to be a HUGE fan of frozen entree's when I was a child, I would have a package at least once a week if I remember correctly. I mean they were so much fun to choose at the store and eat. I have had the kiddie meals, Stouffer's, Lean Cuisine, Healthy Choice, and Smart One's entrees. All of them have a unique aspect to their food. For example Kids Cuisine is marketed towards children because they have kid approved food and bright colors to go with the packaging. Lean Cuisine, on the other hand is marketed towards women because the array of entree's usually have no more than 300 calories a box.
                                                                     - Review-
 First impressions:  I have had Healthy Choice entree's before, but this is a whole new deal.. MICROWAVE STEAMERS! Sounds healthy, right. And they are healthy.
Calories: 250
Fat: 6
Lets face it we need this amount of calories to have a decent lunch. Let me tell you, I was full after eating this with some skinless turkey and a 0 cal drink. The package is heavier than most frozen entree's. That is a good thing because you're getting more food for less calories, salt , and fat.  It takes 5 minutes in the microwave. Upon taking it out, I smelled a WONDERFUL mushroom aroma coming from downstairs where the microwave is.

 Appearance * The box and the actual presentation match pretty well.Both seem tasty looking!!


Appearance is important when you're dealing with frozen entrees. Some frozen entree packaging are known to be misleading in cooked appearance. In the end, we end up eating that frozen egg patty slathered in microwave bacon , right? Our stomachs control our minds sometimes. In this entree, I was surprised by the amount of food I got. Kudos, Healthy Choice, kudos.

Taste: For a microwave pasta meal, the pasta was tender and delicious. Frozen entree companies have improved on their pasta formula over the years, thats for sure. The amount of mushrooms was just right for me, I'm a mushroom lover! The portabella mushroom sauce was a bit bland for me, it actually needed salt. There could have been more fontina cheese on top, it was delicious, and would have taken care of the salt issue, but we are trying to be healthy.

Overall: I would buy this entree, and various Healthy Choice Steamers again.
                                                 Rating    3 1/2 stars

    Rating System: 1 star = never eating this again
                             2 stars= I wasted my money on this meal, but I will eat it because I'm hungry.
                             3 stars= I am satisfied
                             4 stars= Omg this is so good!
                             5 stars= foodgasm. get me more.